Monday, December 17, 2012

Flo's Beef Barley Soup


Mom's Barley Soup

Many  have said that my Mom, Florene- yes that's right, not Florence,  made the best barley soup they ever tasted.  I could not disagree.  It's different than any you'll find on traditional websites and books in that it doesn't call for mushrooms, kale or anything similar.  In addition, it calls for tomato sauce and packaged, dried vegetables that many would frown upon,  Trust me, you need to add both and this is one of the best soups you've ever tasted.  Mom used to cook it in a pressure pot, under pressure for 40 minutes but ironically, I prefer the big Le Creuset pot. 

Ingredients

  • 2 tablespoon good olive oil
  • 2 big marrow bones or what is now called- "beef oxtails"
  • Kosher salt and freshly ground black pepper
  • 2 medium chopped onions
  • 5 carrots sliced in 3/8' or so rounds
  • 5 stalks celery sliced in 1/4" pieces
  • 1 Small can Tomato Sauce
  • 2 pounds of Chuck Steak trimmed and cut in small bite sized pieces
  • 1 Package Knorr Spring Vegetables
  • 1 cup pearled barley

Directions

Heat the olive oil in a large pot like a Le Creuset. Add the oxtails/marrow bones along with a generous amount of  salt and pepper.

Cook over medium-high heat, stirring occasionally, for 10 minutes until browned all over. Remove the oxtails with tongs and set aside in a big bowl.
Add the onions, carrots and celery, to the oil in the pot and cook over medium heat, stirring occasionally, for about 10 minutes.
Add the trimmed chuck steak, cook over
medium high heat for 5 minutes or so; make sure no red left in the meat.  Return the oxtails to the pot, add 1 teaspoon each of  of salt  and pepper.  Add one small can of tomato sauce
Add enough water to about 1 1/2" below top of pot  Add one package of the Knorr Spring Vegetables  Bring to a boil. Lower heat, cover, and simmer for 1 hour or longer if you have time.  Longer is never bad.


Taste soup, adjust seasonings, add barley, cover and cook for an additional 30-45 minutes.  When soup is done, remove the marrow bones and serve  on a plate with a good crusty bread.  Dig your knife down into the bone, spread the absolutely scrumptious and somewhat decadent marrow generously and enjoy!


Buon Apetito!
Murph

Wednesday, July 18, 2012

Wacky Chocolate Cake

Wacky Chocolate Cake with Butter-cream Icing
The Original Recipe in Cherie's Writing on an Index Card

This is the best chocolate cake recipe on the planet, period end of story. 


Cherie's grandma is credited with introducing this recipe into the family many decades ago and it is the first recipe Cherie made. The recipe doubles easily and makes one cake or 12 cupcakes. 

If you've never had the luxury of enjoying a Wacky Chocolate Cake, do not pass go and do not stop until you locate these easy to find ingredients and make one. This is the definitive cake for entertaining because it's easy to make and almost foolproof.

I've decided to include pictures of both the cake and the cupcakes just to show how simple and remarkably delicious this recipe truly is.

The cupcakes were made by Tara and Cherie for a school party and we appropriately decorated.  
A Wacky Cupcake 
The cake was for a birthday celebration for our friends Hank and Joe who have birthdays close together.  

Two Pigs in a Pod above the Wacky Cake
Have fun making this with your family and get creative with icing colors and other decorations.  We've run the gamut from black and orange for Halloween to a pale blue ocean color with the Little Mermaid swimming on top.  As Emeril would say " it's a food of  love" and that's certainly true for this recipe.


Wacky Chocolate Cake

Ingredients

1 1/2 Cups Flour
3 Tbsp Cocoa Powder
6 Tbsp. Vegetable Oil
1 Tbsp Cider Vinegar
1 Cup Sugar
1 tspn Baking Soda
1/2 tsp Salt
1 Cup Water

Preheat oven to 350
Combine all dry ingredients in a mixing bowl and stir until blended.  
Mix all the wet ingredients in a separate bowl and blend well
Pour all wet ingredients on top of dry ingredients and blend well with a spoon or your favorite spatula
Pour all ingredients into a non-greased baking dish or pan.  9 x13 will work but we prefer a bit deeper pan that's actually 9 1/2" x 9 1/2" which makes a taller moister cake.
Bake at 350 for 25 minutes.
Just to be sure, insert a wooden toothpick into the center of the cake and if it comes out clean your cake is done, if it seems to be too moist, bake for an additional 5 minutes.  

As I always point out; baking is altitude dependent and we live at 2500 feet above sea level.  Your actual cooking time will vary according to your altitude.

Remove cake from oven when done and allow to cool completely- about an hour or so.

When your cake is cooled you can move on to the icing...


Butter Cream Icing: 

Note from Cherie:  "I truly just throw this icing together...it's blending of all the ingredients and the key is mixing with an electric beater until it looks  right and has a smooth consistency."

Ingredients for Icing

2 cups (roughly) powdered sugar
1/4 cup of softened butter - not margarine!
1/2 tsp. vanilla
a1/4 cup of half and half or milk
Food Coloring if desired

Add  sugar, butter and vanilla in a mixing bowl and add the milk a little at a time while mixing until the consistency is just right.  It usually ends up being around 1/4 of a cup, but it at times more.  Humidity can play a role.  If it's too thick, add a little more milk, too thin - add more powdered sugar.
After the icing is just the thickness that you like, add food coloring.  The icing should be very creamy white, which is nice, but adding color is fun!  We love the Wilton Brand of  Food Colors because they are so vibrant.


The Birthday Boys- Hank and Joe


Happy Wacky Eating!!!

Thursday, July 12, 2012

Linguini with Clam Sauce


If you've been reading this blog for awhile you know that I regard recipes as guidelines, not formal steps that must be followed.  I experiment a lot and so should you and neither of us should be afraid to fail on occasion.  My worst ever was when I tried to make an omelette from left-over spaghetti and marinara sauce.  It was a disaster and turned into over easy eggs and toast as the back up plan.  To that end, this is my  personalized version of linguini with clam sauce.   Specifically I like to add lemon zest,  roughly chopped tomatoes and a bit of crushed red pepper and white wine in lieu of clam juice.  Are they mandatory?  Of course not., so feel free to fine tune to your personal preference and email me if you make a discovery that must be shared.

Trust your instincts, buy local whenever possible and have a deep spice collection to help fill in the gaps while creating fun variations on your original theme.

Today I went to the local Oriental market and picked up clams for around $5 per pound.


I find "out of the way' markets can be fantastic and use Yelp and Google Places to find local info.


Tips and Comments

All Ingredients Staged and Ready to Go!


*Staging all your ingredients is a must for this fast moving dish


*Thinly slicing garlic and shallots prevents them from becoming bitter


*Buy a garlic peeler (it's a little silicone tube) if you don't already own one; they are fantastic.


* Add a good handful of salt to your pasta water, Americans tend to add far too little.


* A big stainless saute pan is a must for this dish and many others.  


Ingredients
1/3 cup extra­virgin olive oil
1 shallot thinly sliced
5 garlic cloves, thinly sliced 
One Lemon, juiced and zested
1 teaspoon dried hot red pepper flakes ( more you like it spicy)
1/3 cup dry white wine
1 lb linguine
2 lbs. small clams 
2 TBSP butter, cut into small pieces
2 Ripe Tomatoes, rough chopped
1/2 cup chopped fresh flat­leaf parsley


Directions

Begin by bringing a large pasta pot to a boil and remember to add a good handful of salt

Heat oil in a a large saute pan over moderately high heat until hot but not smoking

Sauté shallots and garlic stirring frequently for about 3-4 minutes. 


Add red pepper flakes and  cook, and additional 2 minutes. 


Add Pasta to the boiling water and allow to cook for 4-6 minutes


Drain pasta and save about 2 cups of the starchy for your clam sauce.  It's ok to hold the pasta in your colander for a bit until you add it back to the saute pan with the clams and sauce.


To your saute pan, stir in wine and clams and  about 1/2 cup of your pasta water, you can always add more pasta water later but this is one of the big keys to a great sauce.


Just getting started


Add  lemon juice, zest and tomatoes and half the chopped parsley, stir and cover.


A glass lid comes in  handy
Stir occasionally with a big wooden spoon ensuring all clams open


When the last clam opens, add the linguine, chopped parsley and a bit more or the reserved pasta water if desired.


Finally, remove from heat and add your the two pats of butter, remaining parsley tossing gently until the sauce, butter and pasta are glimmering.


Starting to look really good 


I serve freshly grated Parmesan  and a bowl of red pepper flakes on the side.

BUON APPETITO!


Saturday, July 7, 2012

Mexican Pasta Salad with Green Chiles

Summer is here in Tucson and it's hot and humid at the front end of our monsoon season. Tucsonan's  move quickly from "winter," skip spring and shift immediately into summer. At  Murph's place we all  embrace the outdoors and start making our favorite summer dishes to enjoy with family and friends on one of our outdoor patios.  Evenings are quite a bit cooler and we cook on our grill and eat outside much of the year.


Pasta Salad with Green Chiles
Ingredients

Our Favorite Brand of Cotija Cheese
12 oz Of your favorite tube or bow-tie pasta
2 Cups diced fresh Tomatoes
2 Anaheim Chiles, roasted, peeled and diced
1 Pasilla Chile, roasted, peeled and diced (prepare in advance or dice one cup of whole canned green chili's in a pinch)
1/4 Finely chopped Red Onion
2 Tbsp Red Wine Vinegar
1 stick Butter melted
1 Cup Crumbled Cotija Cheese
1/2 lb. grated yellow cheese
Cherry Tomates
Sea Salt and Freshly Ground Pepper

Directions


Cook noodles to al dente and set aside

Place diced tomatoes and chiles in a large bowl and sprinkle with vinegar

Cover diced onion with water and sprinkle with vinegar

Roast chiles, peel and dice- Tip slightly warm chili's give this salad a great flavor!

Just prior to serving,  melt butter  in a good sized pan and add pasta coating evenly then transfer to a large bowl.

Sprinkle one third of the grated cheese over the noodles and layer half the tomatoes, chiles and onions (minus the water).

Generously season with salt and pepper, and toss well prior to serving!

Monsoons Moving In!


The basis for this recipe was published in the now defunct, Tucson Citizen  newspaper by Alva Torres who wrote a Mexican food column for many years.  We modify every recipe over time but I acknowledge Alva for the great family dishes she shared with her readers.  This basic recipe was originally published in July of 1990 and called "Mama Bella Salad."  Thank you Alva, you have made quite a few us happy over the years by sharing your special dishes.


Saturday, May 26, 2012

Greek Chicken

Greek Chicken and Artichokes on the Grill


Chicken and Artichokes with lots of lemon and garlic
It's Saturday morning in Murph's Kitchen and I woke up thinking a nice grilled Greek chicken would be  a great way to kick off the week end.  For many years the best Greek restaurant in Tucson was called the Olive Tree and they served some of the best food I've ever eaten.  I got to know one of their employees fairly well while putting myself through the U of A and tending bar at the Cork and Cleaver, yet another great spot now known as Jonathan's Cork.  While serving the former employee I managed to extract the ingredients of their famous marinade that I now use on both lamb chops and chicken with modest variations.  This recipe demands both dried and fresh herbs creating flavors you won't believe until you make it yourself.

I am going to make artichokes and start them out my normal way in a recipe posted previously but tonight I will finish them on the grill with a bit of the chicken marinade. Grilled artichokes are a family favorite and after boiling you simply remove the choke, brush with a litlle olive oil and garlic and voila!  You end up with a slightly smokey version of the original packed with flavor.  Greek Chicken is one of those recipes that is nearly fail safe.  In the middle of winter I will make it from start to finish in the oven covered for about 45 minutes at 325 and uncovered for another 30-45 minutes at 350 degrees.  The best way determine if chicken is done is by observing when it pulls away from the bone. The alternative is to insert an instant read thermometer into the thickest part of the chicken and look for a reading of 160 degrees.


Greek Chicken


Marinade Ingredients
3/4 Cup Olive Oil
4 Lemons, 3 Zested and Juiced and one quartered
3/4 Cup dry White Wine
1 tspn Sea Salt
1/2 tspn White Pepper
1/4 cup chopped fresh Rosemary
1 Tbsp Dried Oregano
8-10 Cloves Pressed Garlic


1 Whole Chicken cut up plus whatever it takes to feed everyone!


Make marinade early in the day by adding all the ingredients to a large mixing bowl whisking to combine well.  Depending on how much chicken you have, either place it all in a gallon ziploc bag or spread it out in a large baking dish.  Marinade for at least 8 hours and turn every couple of hours to ensure proper coverage.


Take you bag of  chicken out of the frig at least one hour prior to cooking allowing it to reach room temperature.  Cold chicken tends to burn on the outside and takes much longer to cook.  Place the chicken in a large baking pan and grab your favorite basting brush prior to heading outside.


Ready for the Grill!


Pre-heat grill to a medium low temperature and carefully place chicken pieces on the grill leaving a bit of room in between each piece to ensure even cooking.  I like to leave my grill cracked a little allowing the smoke to escape.  Make sure the grill is not so hot as to cause the chicken to flare up.  You want the skin to be crispy but not burned.  This is not a "set it and forget it" type of grilling and requires constant attention to prevent both flare ups and burnt chicken.  
Turn the chicken every five minutes or so and if one section of your grill is hotter than another move the pieces around to be certain they are all done at the same time.  Keep brushing the chicken with a long handled marinade brush each time you open the lid to turn the chicken. Frequent basting results in tender, juicy chicken. This process usually takes me about a little over and hour and I cut into a large thigh or breast to verify the chicken is done.  You can always insert an instant read thermometer into the thickest part of the largest piece and if it reads 160 degrees, it's done.   


As mentioned above you'll have to refer to another post in Murph's Kitchen to grab my artichoke recipe.    If you choose to make both the artichokes and the chicken, place the chokes on the grill at about the 45 minute mark. I use the same marinade on the chokes right after I place them on the grill and brush both sides only once.  After they are a bit charred, remove to the same platter you will use to serve the chicken.  The combo of the chicken and the chokes makes for a very appealing presentation.


I like to serve rice or roasted red potatoes with this and it also goes well with a simple salad covered with the Creamy Lemon Salad dressing you can find in a prior post.


The Aroma is incredible and the flavors are remarkable!


Buon Appetito!

Sunday, May 13, 2012

Luanne's Ground Beef Tacos


Crispy Fried Tacos!
Taco Night in Murph's Kitchen

Every family has their own food traditions and the Murphy's are no exception.  Tonight we will highlight one of my wife's family traditions with her mom's tacos.  Cherie's lineage begins in southern Illinois where the food traditions are hearty and delicious.  Luckily for both of us we grew up eating great food and are handing those traditions down to our children.   Tonight we have a guest chef, Luanne aka "Nana" and she is a great cook and my mother in law.  Luanne and Ray, who taught me how everything I know about grilling, moved to Tucson in 1961 and promptly fell in love with the local cuisine just as I did when I first visited Tucson in 1975.

Apparently, one of the hot spots for tacos back in the 60's was called Lloyd's and was located near the University of Arizona.  Nothing fancy but they were renowned for great food.  There are only a couple of different ways to do the classic ground beef taco.  The first is to cook the beef separately with your favorite spices and then spoon it into a pre-formed  taco shell and the second is to form a spiced patty inside the tortilla and deep fry both beef and tortilla at the same time forming the crispy taco shape in the hot oil.  This technique imparts full flavor and enables you to add your own fillings as taste dictates.  Our kids clamor for these when Nana visits!

Nana and Cherie working away!

Like me, Luanne is  largely self taught  and not afraid to try new things.  After enjoying Lloyd's  tacos for some time, she decided to take on the challenge of creating them in her own kitchen. A bit of trial and error ensued and eventually she perfected the techniques required and, trust me, these are some of the best tacos you will ever eat if you dare to make them on your own.


Murph and Nana shredding lechuga!
There are just a few of finer points you should know prior to jumping in.  First, buy the leanest ground beef  you can find.  We prefer the 93% lean  which prevents the spattering that would occur otherwise. Second,  liberally season the beef  with salt and pepper prior to the frying process and it's best to use vegetable or canola oil for frying as olive oil permeates and alters the flavors dramatically. Finally, spread the beef all the way to the edge of the corn tortilla prior to immersing in oil.   Once the frying process starts, the beef pulls away from the edges of the tortilla.  Technique is a big component of success here during the frying process as is a roll of paper towels and a good sized sheet pan.  Finally, a good set of long handle tongs is a must for this dish.

Lettuce tip: if you prefer finely shredded lettuce as we do, alway shred from the inside of the head not the outside rounded portion. It is much easier to catch a fine edge with a sharp knife from the inside of the head.


Okay, I have a bit of a confession for this blog.  We've discovered the "Skinnygirl Margarita" at Murph's Kitchen and after a bit of coaxing from Cherie, I've jumped in and enjoy this utterly refreshing  drink, especially when we are having our favorite dishes from south of the border.  We salt the rim and squeeze a liberal amount of fresh lime on top prior to serving and it's a great cocktail on a warm evening.

Remember, this is a fun dish that the whole family can help prepare.  Family traditions around food are at the centerpiece of many of our lives and cooking is a team sport here at Murph's Kitchen.  We make it together, we serve it together and we all have fun doing it together.  From Murph's kitchen to yours, I hope you give these a try and have fun with the endeavor!


Luanne's Tacos 
Ingredients

2 Pounds Lean Ground Beef
Two Dozen Small Corn Tortillas
One Head Shredded Iceberg Lettuce
2 Chopped Ripe Tomatoes
Queso Fresco or Cotija Cheese
Trader Joe's Fancy Shredded Mexican Blend (or your favorite)
Salsa Fresca
Salt
Pepper
Crisco Oil

Begin by shredding the lettuce as finely as possible, chopping the tomatoes and hand crumbling the cotija cheese.  Keep all these ingredients in  bowls in the frig prior to serving as the best tacos have cold crispy lettuce on top.  Cover the bottom  of a large skillet with roughly 3/8 inch of oil and heat to medium high.  Test the oil by dropping a few grains of salt into  it and if it spatters, the oil is good to go.

Preheat oven to 200 degrees; it will serve as your holding bay during the frying process.

Lay the tortillas flat on a cutting board and gently pat the ground beef in a semi circle to a thickness of about 1/4 inch making sure the meat makes it all the way to the edge.  Season with a generous amounts of salt and pepper. I usually do this in batches making about 6-8 at  a time.  This is one dish where a helper is a big plus.  My daughter Tara who is 14 has been helping Nana by spreading the ground beef and seasoning since she was about 6 years old.

Grab the pre-made tacos by the meat side and gently drop the open side of the tortilla into the hot oil very slowly.  Once the tortilla is half way immersed in the oil, fold the meat side on top making a perfect half circle.

Cook for about 1-3 minutes per side ensuring you get that golden brown required by the tastiest tacos.  Slide your tongs in slowly under the taco and gently flip being careful no to loft the front of the tongs as the oil will run back down the handle and burn your palm if you're not careful.

Once both sides are golden brown, lift the taco from the pan and hold sideways draining as much oil as possible from each shell.
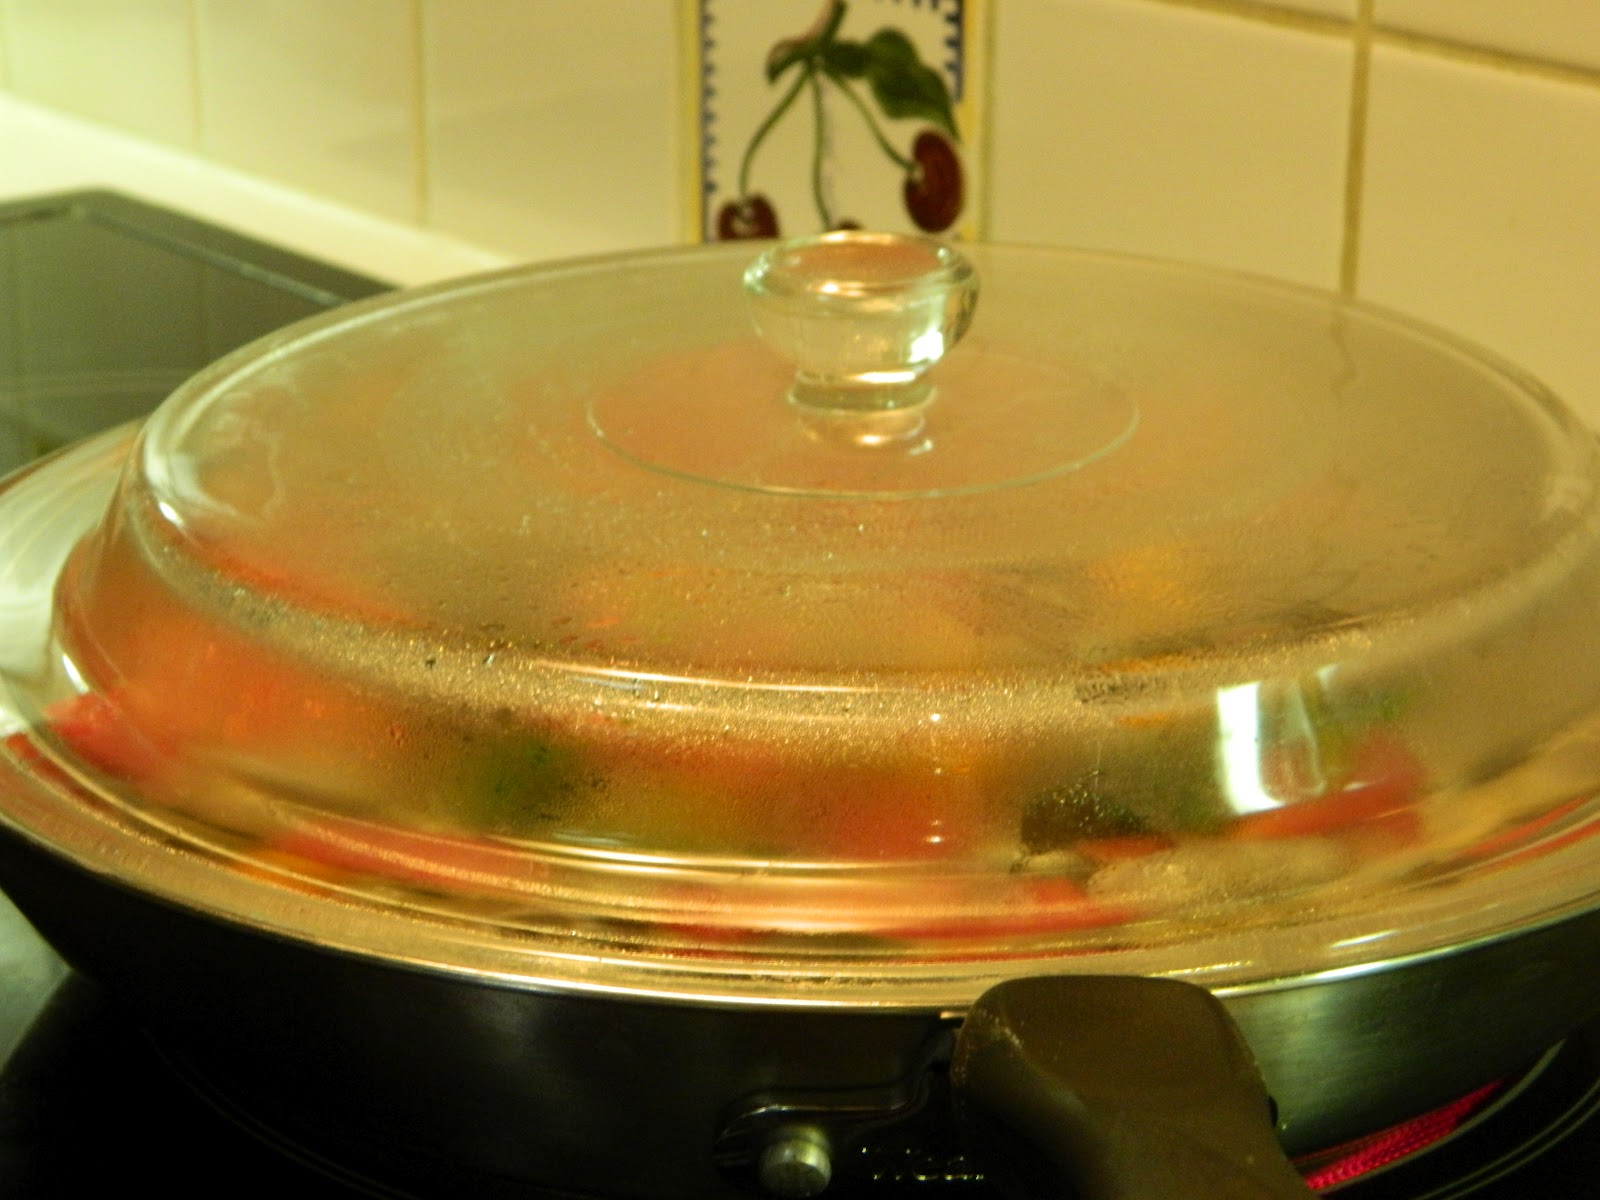
Draining the oil is critical

Cover a large sheet pan with paper towels and place the finished taco on the tray allowing to cool for a few moments prior to wrapping the whole thing in its own individual paper towel.  This technique helps eliminate much of the greasiness that might occur.


We serve the shells on a big tray with the condiments on the side so everyone can dress them their own unique way.  I prefer to add the cheese first so it melts a bit next to the warm beef and I always add the salsa last but there are as many different approaches as there are people at the table.  This is a great meal for a large party and seems to impart a special air of fun.

All the makings for a perfect taco


I like my tacos with an ice cold Dos Equis on the side but a Margarita is never a bad choice either!

Happy Eating!


Saturday, April 7, 2012

Happy Easter!!!

From all of my "Peeps" to all of you and compliments of my very talented bride we wish you and yours a Blessed Easter!

Sunday, April 1, 2012

Roasted Veggies

Roasting veggies is a free form art and is just as easy as steaming.  The key is selecting veggies that pair well together, look good on the plate and have lots of flavor.   Be creative and use whatever is in season!

Ingredients
1/2 Pound Fresh Green Beans cut in 1-2 inch lengths
1 Red Bell Pepper roughly chopped
1 Onion roughly chopped
3 carrots cut in 1-2 inch pieces
Olive Oil
Sea Salt
Fresh Ground Pepper
Preheat oven to 350 degrees

Chop all veggies and place in a large bowl.  Drizzle with olive oil and season liberally with sea salt and freshly ground pepper.

Bake uncovered for 15 minutes, stir veggies with a long wooden spoon and bake 10-20 minutes longer until veggies reach your personal point of desired doneness.   We like our veggies a little crispy here at Murph's Ktichen so 20 minutes usually gets the job done.

Happy Eating!


Sunday, March 25, 2012

Murph's Chicken Soup

March 18th, 2012

The "Day After" Tara's birthday...
It's a cold and rainy here in the desert; a perfect day to make chicken soup.  If your Mom made chicken soup, there's a good chance you think her's was the best and after all, the view is always in the eye of the beholder.  I order chicken soup everywhere I travel and a good Jewish deli with a well crafted matzo ball  soup is one of my favorite indulgences on the road.  I took Cherie to the Carnegie Deli in Manhattan many years ago for her first Matzo Ball soup and let's just say she's never quite recovered.  There's magic in chicken soup whether its home made or out of a can. I have found over the years, not only does chicken soup soothe the soul and help a cold, it may be the best way to re-enter the world of eating normally after a bout with the flu. Truth be told, our youngest daughter celebrated her birthday last night, only to be stricken by the dreaded stomach flu in the middle of the night.  In lieu of the normal family dinner birthday celebration combo tonight, we will hope she awakens ready for a little chicken soup to help her recover.

Like most soups, the basic ingredients are the same, the cooking process is easy and relatively similar and the aroma that fills the house for the hours preceding dinner help your appetite build.  My Mom made some kind of soup every Saturday when I was a kid.  My favorites were her barley soup and her chicken soup.  So, like most of my recipes, I learned the basics from Mom and added a little twist or turn here and there.  If you are adept with a pressure pot, this whole drill can be reduced to 90 minutes or less.

I begin just about every soup the same way: cover the bottom of a large stock pot with a little bit of olive oil, add chopped veggies seasoning them well, then add your meat along with any  beans, lentils split peas etc. and  cover with water, bring to a boil reduce heat, cover with a lid and cook until done.

Murph's Chicken Soup
Ingredients
One Whole Chicken(4-5 pounds) quartered
2 Cloves Garlic, finely minced
2 Onions peeled and roughly chopped
4-6 Large Carrots, peeled and cut diagonally into one inch chunks
4 Celery ribs cut into 1/2 inch chunks plus celery leaves from one bunch
2 Bay Leaves
6-10 whole black peppercorns
2 tsp kosher Salt
Olive Oil
One pound of egg noodles or you favorite pasta

Heat your favorite  6-8 quart stock  up to medium and cover the bottom of the pot with olive oil.
Add chopped onions, minced garlic, celery and carrots.
Murph's version of "rough chopped" onions
Stir frequently for a few minutes and season well with sea salt and fresh ground pepper.  The point here is not to cook the veggies but just to get the headed in the right direction and well seasoned.

The veggies in my largest stock pot
Add Chicken, including internal parts if included along with Bay Leaves, Salt and Whole Peppercorns.
Give it all a good stir, increase heat to medium high and cover completely with water.
Bring to a vigorous boil and cook uncovered for 10 minutes.
Reduce heat to a simmer, cover and cook for at least 2 hours.
While cooking it's a good idea to skim some of the fat off the top every half hour or so.
Test chicken for doneness with a fork at about the 2 hour point.  If chicken is cooked completely and falling off the bone remove parts and set aside.


I like to use a mesh wok ladle for this task removing chicken, bay leaves and returning veggies to the pot.

Chinese strainer works best for removing chicken

Allow chicken to cool completely.
Once it's cooled, remove skin, set aside and shred chicken returning bite size pieces to the stock pot.
Increase heat to medium and return to a boil.
Add egg noodles or pasta and cook until tender.

On a final note you can use this recipe as a basic stock recipe by simply omitting the noodles or pasta.  If your really want to delve into variations of chicken soup I would highly recommend Molly O'Neill's "New York Cookbook"  It is one of my favorite cookbooks for everything from soups to Italian dishes, fresh seafood recipes, barbecue and everything in between.  It's also a great reference for New York eateries and includes many of the places my parents and grandfather took me I was a kid.

Murph's Chicken Soup- it cures what ails you!


Serve with Saltines or Ritz Crackers and enjoy!!

Sunday, March 18, 2012

Creamy Goat Cheese and Garlic Spread

Best Darn Goat Cheese Spread You'll Ever Have!
Our friend Renee gets all the credit for this dish.  I vividly remember the first time she served this to Cherie and I and it makes my mouth water to this day.  Quite often we find ourselves having a spontaneous gathering and this is a dish that can be made quickly with ingredients on hand and your guests will rave.  No cooking is required and the only planning needed is to take your goat cheese log out of the frig about 20-30 minutes prior to adding these simple ingredients to a food processor. This can also be made a day in advance if you are having a dinner party.

The Birthday Boy in action.
Tonight we are attending a birthday party for my buddy Ron and have chosen to bring an appetizer. It travels well, along with pita chips, water crackers and spreads nicely on crispy rounds of toasted Italian bread, fresh celery and we often serve with a bowl of mixed kalmata and stuffed green olives on the side.

Seriously, who needs dinner after this? 

Creamy Goat Cheese and Garlic Spread
Ingredients
11 oz. log of Goat Cheese
3 Teaspoons Extra Virgin Olive Oil
4 Cloves of fresh Garlic,  peeled and minced*
*Note Remove the green "germ"  inside the garlic as it will make the dip bitter
1/2 teaspoon Salt

In a food processor add all ingredients and blend until smooth.  Be sure to pour the Olive Oil in last,  directly into the spinning processor.  Can be served immediately or refrigerated overnight.

Crackers and Crudite Complete the Dish!


Notes: Trader Joe's is my favorite place to shop for all varieties of cheese and the "Silver Goat Cheese" comes in an 11 ounce log that's a perfect size for this recipe.  I frequently add additional ingredients like sun dried tomatoes, fresh basil, fresh thyme or fresh rosemary  creating fun variations and compelling flavor profiles.


Always start with the basic ingredients listed above and never add any more than one more ingredient.  Sun dried tomato makes for an unusual color but a great taste and basil gives off an irresistible aroma.  Experiment and have fun with it!


  • Buon Apetito!

Monday, February 27, 2012

Second Grade Salsa


Salsa Fresca- An absolute rule in Murph's Kitchen is that one must learn to like spicy food.  I have watched my children chuckle as friends from near and far gasp after taking a bite of one of our family favorites.  We  think of ourselves as connoisseurs of  spice in that we don't eat ghost peppers, downplay the scotch bonnets along with the habanero's but we are raving fans of the jalapeño and serrano.  Tonight is the annual academy award dinner at our house.  Usually a couple of friends drop by and we have a casual and fun evening.  Tonight our dear friends the Brandt's will be stopping by and the theme will be Mexican. I made a batch of fresh salsa last night because it's always better to let it spend a night in the fridge before you dip the first crispy chip!

My daughter Tara,  now 13, brought this recipe home from school when she was in the second grade.  Hence we refer to it as  "Tara's Second Grade Salsa" and it's a spicy, refreshing and easy to make dish.

Second Grade Salsa

Ingredients

5 Tomatoes chopped
1 Small can diced Green Chili's(even better if you roast your own)
1/2 cup Cilantro finely chopped
2 fresh Jalapeño Pepper's seeded and finely chopped
3 Cloves Pressed Garlic
Juice of 1 Lime
1/2 tsp Salt
1 Small Onion, finely chopped
1 Tbsp Crushed Red Chili Flakes(Optional- but a great addition if you like spicy!)

Add all ingredients to a food processor and and pulse until the salsa reaches your desired consistency.  Some like it chunky like a pico de gallo and others like smooth like a more traditional Sonoran salsa but you get to make the call as you pulse your processor.  It's fine to make this and serve immediately but it always gets better after spending a night in the fridge.

Serve with Chips and Enjoy!!!


Sunday, February 19, 2012

Cherie's Cowboy Caviar

There's more than one kind of Caviar...
Out here in the West we are a little crazy about our chips and dips.  I've been known to drive across town to pick up a bag of freshly made chips along with some fiery salsa and fresh guacamole  from one of  my favorite hole in the wall Mexican restaurants.  Not that I don't make my own, but sometimes you've just got to get a fix.

This recipe, like so many of our favored dishes is one that's been re-worked over time to suit our tastes.  We like things spicier than most and suggest you play with this one to make it your own.  I strongly suggest you serve little serving plates with this dish as the black eyed peas don't always cooperate when resting atop a crispy tortilla chip.

Cowboy Caviar
Ingredients
1 15 oz. Can Black Eyed Peas, drained
1 11 oz. can White Shoe Pegged Corn, drained
4-6 Ripe Tomatoes, chopped
1 bunch finely chopped Green Onions
1/2  Cup roughly chopped Cilantro
2 Tbsp Red Wine Vinegar
2 Tbsp Tobasco or Trappey's hot sauce
Juice of one Lime
3 Ripe Avocados, cubed
4 Garlic cloves, finely chopped
1 tsp freshly ground black pepper
1 tsp garlic salt
2 tsp sea salt
Large Bag of your favorite tortilla chips, the "scoop" style work really well for this dip

Mix all ingredients (except chips and avocado) together in a large mixing bowl.  Let sit in the frig for several hours  but remove  at least 30 minutes prior to serving.  After removing from frig, add freshly chopped avocados and mix well.  Serve with side plates and a large bowl of chips.

Stand by waiting for the ooh's and ahh's as your friends and family marvel at this odd concoction but enjoy its compelling combination of flavors.

Enjoy!!


Cowboy Beef Stew

Cowboys and Cowgirls in Murph's Kitchen


It's Rodeo Week in Tucson and the oldest continuously operating rodeo in the country is coming to town for a week Western fun.  Cowboys from all over the world will be here seeking to become the next champion in this prestigious event.  If you have ever been to Tucson, you  know what I mean when I say that we are the "smallest big town in  America."  This week it's ok to wear boots and jeans anywhere you go and boardrooms and bar rooms will be filled with real cowboys and the rest of us "wanna be's" who just love the West and may have been overexposed to John Wayne and Clint Eastwood in our youth.

Beef Stew is something of a tradition in my family.  I cooked my first batch over an open fire when I was a young patrol leader in BSA Troop 147.  Lots of versions have come and gone but the key ingredients remain the same.  Lean beef, onions, carrots, celery and potatoes are all required in my book.  Ingredients like red wine, beer, fresh herbs etc. may enhance the flavor but are surely not required.  Like all great dishes it begins with the basics and can be expanded or refined based on your personal  preferences.

Tonight we hosted our dear friends Marty and Renee( a great cook in her own right) and enjoyed a great bottle of 2007 St. Francis Merlot that they brought with them that complimented the stew quite nicely!

Cowboy Beef Stew
Ingredients
6 slices of thick cut Bacon
2-3 pounds of beef stew meat, cubed
2 Large Onions, roughly diced
6 stalks celery, 1 inch chunks
1 Pound Carrots, 2 inch chunks
1 Pound Green Beans, 1inch sections
1 Bottle Dark Beer
32 oz. Beef Broth
2 Pounds Potatoes,  cut in eighths chunks
1/2 Pkg Frozen Okra
1 Tbsp Soy Sauce
1 Tbsp Tomato Paste
3 Bay Leaves


Directions


Brown bacon in a large dutch oven over medium high heat
Remove to a paper towel and allow to cool
Add Beef, seasoning generously with salt and pepper and turn continuously until fully browned
Add Onions, Celery, Carrots,  and saute for about 5-7 minutes.
Add potatoes and stir
Add beer, tomato paste, soy sauce, bay leaves and turn to high heat, allow to come to a good boil and then reduce heat to medium high
Simmer for a few minutes to reduce liquid by about a third
Add Beef Broth and bacon and bring to a boil
Once the stew boils, reduce heat to low and simmer covered for at least 90 minutes
Thirty minutes prior to serving add half a bag of frozen okra, cover and simmer for an additional 10-15 minutes.  Okra actually thickens the gravy a bit and adds a nice flavor.

Taste and adjust seasoning as needed.

A little sweet, a little savory and totally scrumptious!


Serve with corn bread or your favorite freshly made biscuits and enjoy!!

Tuesday, February 7, 2012

Super Crispy Oven Fried Chicken

Sunday night in Murph's Kitchen once again and it's time for an easy and delicious oven fried chicken.  
Cherie and I have tried dozens of these recipes over the years in search of the perfect version only to find the best recipe is often the one that comes from merging together numerous  techniques from several sources.  As usual we add a little extra spice to just about what others consider "normal" and this crispy crowd pleaser has a little cayenne pepper and a healthy amount of Szego Hungarian Hot Paprika.  We tripled this tonight.  We are serving some roasted veggies that I will cover in a separate post.  


It's all good especially when you've got the kids coming over, Jackson Brown playing in the background accompanied by a cold, crisp glass of chardonnay.


Ingredients
Extra Virgin Oil
3-4 Pound Whole Cut Up Chicken- Free Range Preferred
1 Cup Progesso Italian Style Breadcrumbs
1/4 Cup grated Romano Cheese
3 Garlic Cloves- Pressed or Finely Minced
1 tspn sea salt
Fresh Ground Pepper
3 Eggs Beaten
1 tspn milk
1 tspn Cayenne Pepper
Hungarian Hot Paprika


Preheat oven to 350 degrees


Combine breadcrumbs, grated Romano, pressed garlic, salt, fresh ground black pepper and cayenne pepper  in a bowl and spread out  on a sheet of waxed paper either on your counter or over a large platter. 


Beat eggs, add milk and place in a shallow bowl alongside the wax paper.  


Roll chicken pieces in crumb mixture, dip in the egg wash and roll again in the bread crumbs.  


Place chicken  pieces on an cookie sheet already covered with tin foil leaving a little space between each piece.
Note the liberal amount or Paprika
Drizzle each piece with olive oil and dust with the Hungarian Hot Paprika.
Bake until golden brown begin checking at 45 minutes but depending on size of chicken pieces this usually takes closer to an hour.  


A good rule of thumb for chicken is to stick your instant read thermometer into the chicken making sure it reads 160 degrees.  Allow chicken to set for 5 minutes or so after removing from the oven.  
Super Crispy, Super Juicy, Super Tender!


Happy Eating!

Sunday, January 22, 2012

Thai Chicken Stir Fry with Basil, Lime and Coconut Milk

Thai Chicken with Basil
Sweet Basil, Coconut Milk and Spicy Peppers Make this dish!


Once again it's Sunday afternoon and we have lots of fresh basil on hand from Trader Joe's.  I am a big believer in fresh ingredients  I am going to make a Thai dish inspired by the basil.  I truly enjoy cooking in a wok, have owned one since college days and prefer spicy stir fry dishes so the stars are aligned for a great dish on a great night. 

Wok Tips-Here are a few things about wok cooking I've learned over the years.  First, it's fundamental to prep all ingredients ahead.  Do all grating, chopping, slicing, marinating etc,  prior to heating the wok.  If you don't have a wok, a good saute pan with high sides will do.  After slicing and dicing, stage all ingredients in the order that they will be used right next to the stove making the task of " stir frying" that much easier.  A good bamboo spoon and a wok style spatula go a long way when quickly turning ingredients in the pan.

We serve this over rice but vermicelli pasta is fine.  Either way, it's best to have lots of sauce!


Ingredients
4 Boneless Skinless Chicken Breasts- thinly sliced
1 Can Unsweetened Coconut Milk
Juice of two fresh limes
3 Tbsp Soy Sauce
3 Tbsp Rice Wine Vinegar
1 Tbsp Fish Sauce
1 Tbsp Red Chili Flakes
2 Heaping Tbsp Coconut Oil (Trader Joe's Organic is Great)
3 Tbsp Grated Ginger
6 Cloves Garlic Minced
2 Cups Thinly Sliced Green Beans
1 1/2 Cups Shredded Carrots
2 Serrano Chili Peppers-  Sliced Thinly on the Bias--or not if you don't like spicy
3 Mexican Green Onions
2 Cups Shredded Fresh Basil


Directions


In a medium mixing bowl, combine soy sauce, rice wine vinegar, fish sauce,coconut milk and lime juice.
Heat wok wok to high  and stir in Heaping Tbsp. Coconut oil.
Quickly add  half the grated ginger and minced garlic along with half the red pepper flakes. The key here is to flavor the oil prior to adding the chicken- cook for one minute
Turn Chicken Constanly!
Add sliced chicken turning constantly until fully cooked. Remove and set aside.
Add one more Big Tbsp. of Coconut oil
When coconut oil is hot add the remaining garlic, ginger and chili flakes
Add veggies other than basil and turn veggies constantly for about 2-3 mins.
Add already cooked chicken and turn for 2-3 more minutes
Add shredded Basil
Add Liquid Mixture and turn for another 2-3 minutes
Serve over fresh rice and enjoy!


Buon Appetito (kŏr hâi jà-rern aa-hăan!)